Install an Access Tier using Docker
Install the Access Tier on a server running Docker
- Updated on Dec 15, 2022
- 9 minutes to read
-
Contributors

Note: Netagent v2 has been released, simplifying the process of installing and configuring an Access Tier:
1. Use an API key with the access_tier scope for registration
2. All agent configuration is done via the Command Center API and UI
If you need to install Netagent v1, use the legacy v1 guides.
Steps
Install the Access Tier via the following four steps.
Step 1. Register your Access Tier
1.1 Log into the Command Center, and navigate from Networks > Access Tiers.
1.2 Select + Create Access Tier, and configure the required parameters when going through the installation wizard. An existing API key is required; these should appear in the dropdown menu of the API Key field on the Configure tab. If you don’t have an existing API key, navigate from Settings > API Keys and select + Add API Key, then select the access_tier scope.
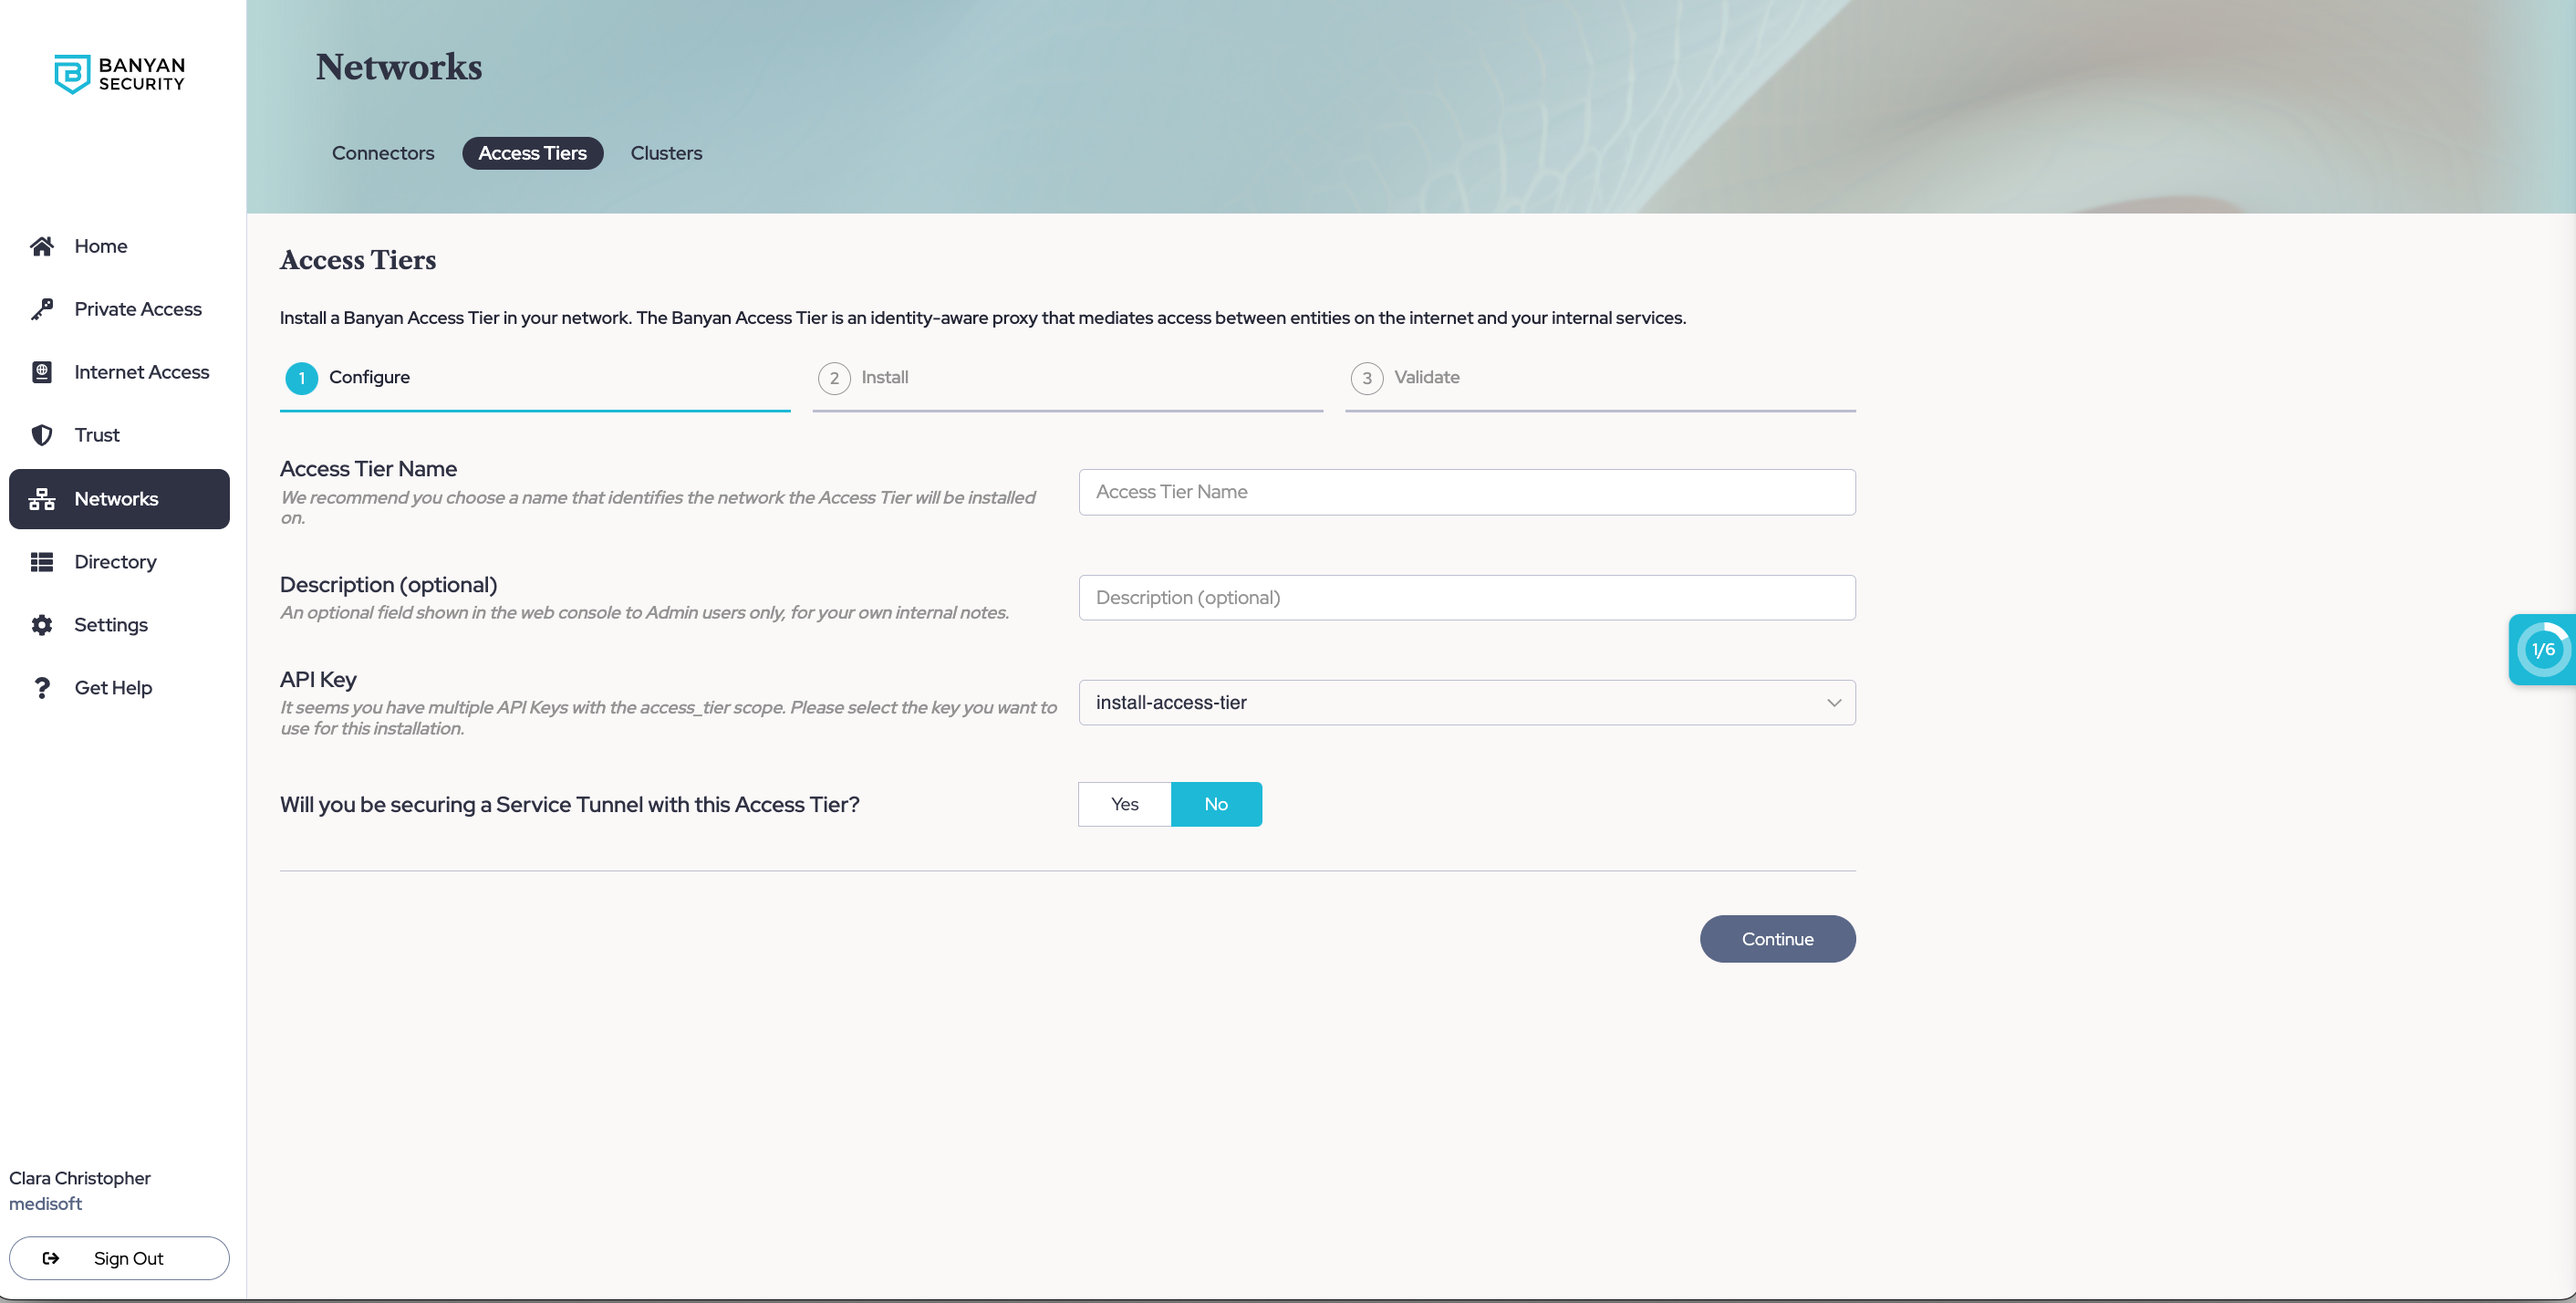
1.3 If you will be using this Access Tier to secure an existing Service Tunnel, enter the required information to set up Service Tunnels.
1.4 Optional: If you want to enable Private Resource Discovery (to view a summary of commonly accessed private resources accessed by end users via Service Tunnels), then, under Advanced Settings, toggle on Enable Private Resource Discovery.
1.5 Select Continue to proceed to the Install tab.
1.6 Take note of the installation parameters for use in subsequent sections.
Step 2. Review the Pre-Install Checklist
Network Reachability
-
The Access Tier server(s) should be located in your internet-facing DMZ and have a public IP address, so that it can be reached from anywhere on the internet.
- Configure a public wildcard DNS record that follows your corporate domain name convention to map to the Access Tier’s public IP address
- A common pattern is to use
*.corp.example.com. Then, corporate services can be exposed to your users aswebsite1.corp.example.com,sshserver2.corp.example.com, etc. - If you’re deploying multiple Access Tiers across multiple locations, you can further scope the subdomains into
*.east.corp.example.com,*.west.corp.example.com, etc.
- A common pattern is to use
- Expose the following ports to the internet so the Access Tier can accept inbound connections from the internet:
| Ingress Port | Protocol | Traffic | Used by Banyan Service Type |
|---|---|---|---|
80 |
TCP | HTTP | N/A (will be redirected to HTTPS) |
443 |
TCP | HTTPS | Hosted Websites |
8443 |
TCP | MTLS | Infrastructure (SSH, RDP, etc) |
51820 |
UDP | WireGuard | Service Tunnel |
- Ensure the Access Tier can make outbound connections to following addresses:
The netagent binary supports HTTPS proxy settings. If an Egress proxy is configured on the host via the HTTPS_PROXY environment variable, outbound connections from the Access Tier will automatically use it.
| Egress Address | Protocol | Purpose |
|---|---|---|
tcp://{shield-location}.banyanops.com:{shield-port} |
TCP | Connect to its Shield (Cluster Coordinator) to receive Policies and send Event data |
https://net.banyanops.com |
HTTPS | Connect to the Command Center for installation and configuration |
https://{orgname}.trust.banyanops.com |
HTTPS | Connect Command Center TrustProvider component to authenticate OIDC JWT tokens used for web access |
- Ensure your networking policies allow traffic to flow from the Access Tier server to backend machines running the applications and services you need to secure access to.
Step 3. Download, Configure & Install
Set Environment Variables
Set the environment variables on the Linux server on which you’ll be installing the container.
# Set env vars to specify Access Tier connectivity parameters
export API_KEY_SECRET=              # API key generated via the Command Center ("access_tier" or "Admin" scope)
export COMMAND_CENTER_URL=          # Command Center URL, such as https://net.banyanops.com
export ACCESS_TIER_NAME=            # Display name of an existing Access Tier in the Command Center
export ACCESS_TIER_PUBLIC_ADDRESS=  # (optional) public address for this Access Tier, such as "corp-dns-cname.example.com"
export HTTPS_PROXY=                 # (optional) specify to configure HTTPS_PROXY environment variable
Install
Note: If you’re using optional environment variables ACCESS_TIER_PUBLIC_ADDRESS or HTTPS_PROXY, append it to the end of the third line below.
docker run --privileged --cap-add=NET_ADMIN \
	   -v /dev:/dev -v /lib/modules:/lib/modules \
	   -e API_KEY_SECRET -e COMMAND_CENTER_URL -e ACCESS_TIER_NAME \
	   -p 80:80/tcp -p 443:443/tcp -p 8443:8443/tcp -p 51820:51820/udp \
	   -d gcr.io/banyan-pub/netagent:2.8.5
If your server needs root privilege to run docker via the sudo command, remember to add -E so your environment variables get passed through. Your command will then look like sudo -E docker run ...
Banyan’s Netagent binary leverages Linux kernel networking, including IPTables and WireGuard. The Docker container needs to be run in privileged mode with the NET_ADMIN capability to configure networking correctly.
Step 4. Validate
Once the Access Tier is installed, you can check its logs using docker logs to ensure it is functioning as expected.
Under Networks > Access Tiers > [Your Access Tier] section of the Banyan Command Center, select the Test Connection button to verify that your Access Tier is correctly installed.
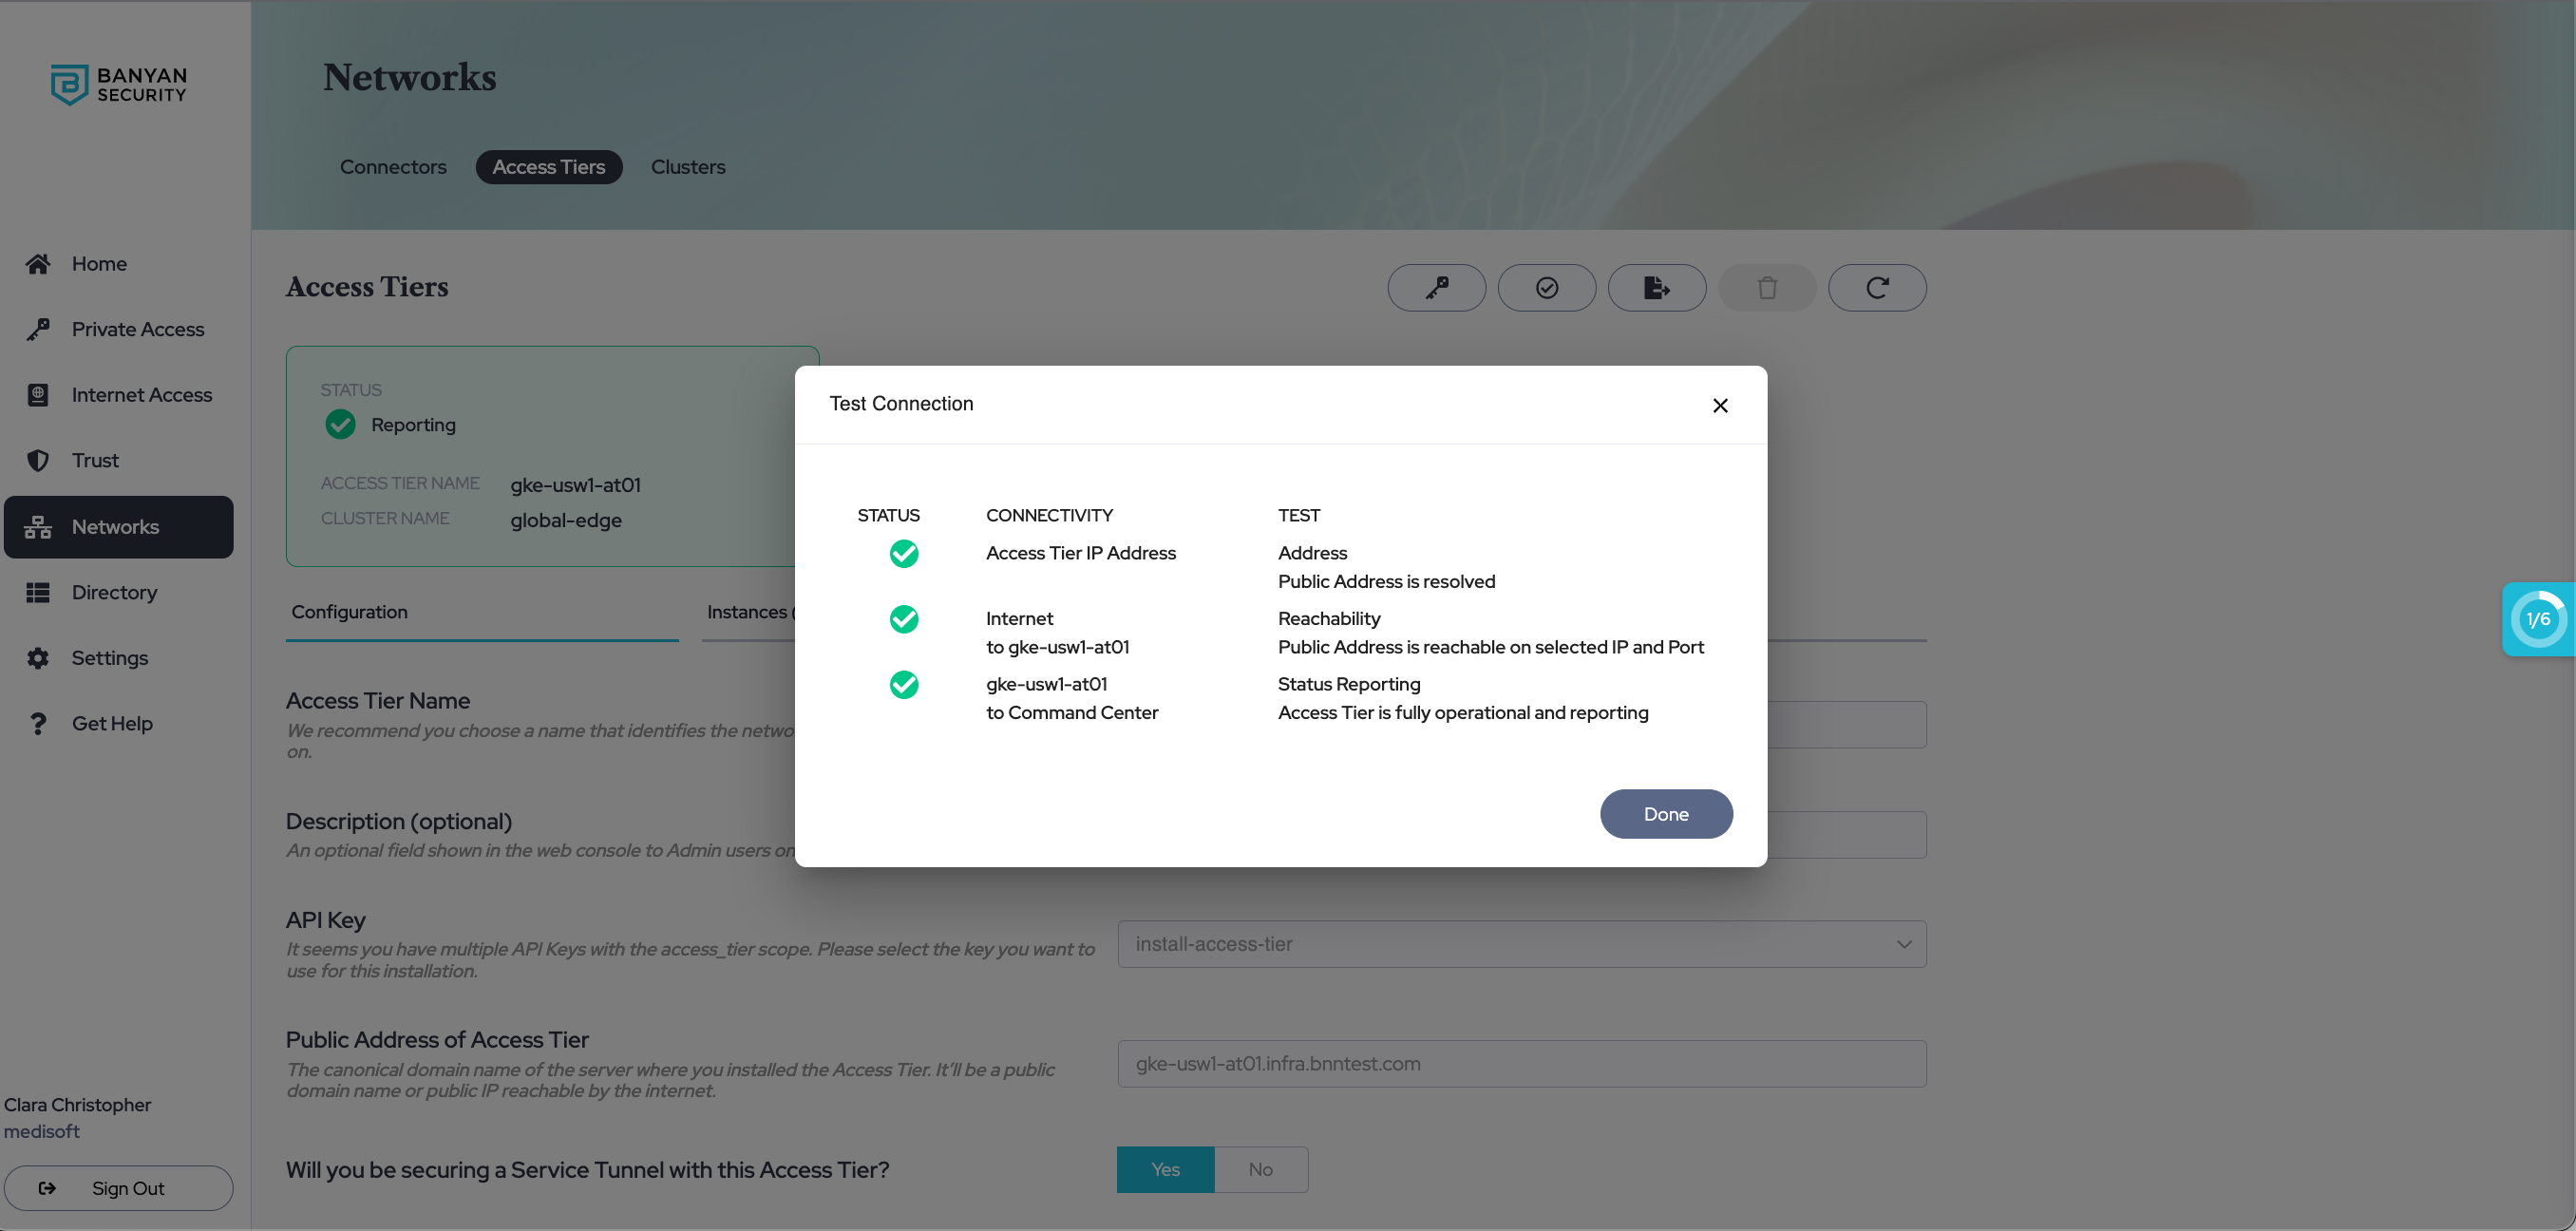
Access Tier - Test Connection
Additional Notes
Upgrading Netagent
Upgrading Netagent follows a very similar process to installing it. Stop the running container, and start up a new one with the latest version of Netagent.
Note: If you’re using optional environment variables ACCESS_TIER_PUBLIC_ADDRESS or HTTPS_PROXY, append it to the end of the third line below.
docker run --privileged --cap-add=NET_ADMIN \
	   -v /dev:/dev -v /lib/modules:/lib/modules \
	   -e API_KEY_SECRET -e COMMAND_CENTER_URL -e ACCESS_TIER_NAME \
	   -p 80:80/tcp -p 443:443/tcp -p 8443:8443/tcp -p 51820:51820/udp \
	   -d gcr.io/banyan-pub/netagent:2.8.5
Can’t find what you’re looking for?
We’re happy to help. Contact our team.